5 Ways to Convert a TIFF to JPG Format
- How to Choose JPEG Quality
- MacOS Preview App
- Microsoft Paint
- Adobe Photoshop
- Photo Mechanic
- MacOS Finder “Convert Image” Quick Action
- Are Online Converters Safe?
First, Know How to Choose JPEG Quality
While saving a JPEG, most apps will ask you to choose a “quality” or “compression” setting. In JPEG files, when you increase the image quality, the file size gets bigger, but if you decrease the quality, the file size gets smaller.
Not all apps use the same words to describe this setting. You may be asked to choose a preset like small/medium/large quality, low/moderate/high compression, or a rating such as 1 to 10.
Just remember two things:
- If the setting is called quality, then a high setting means better image quality and bigger files.
- If the setting is called compression, it’s the opposite. High compression lowers the image quality to get a smaller file.
Sample Comparison of JPEG Quality
The image below shows the same section of the Mona Lisa saved from Adobe Photoshop at two different quality settings.
- Left half
- “Maximum” quality (10 out of 12).
- Right half
- “Low” quality (0 out of 12).
Look closely. Can you see the differences?
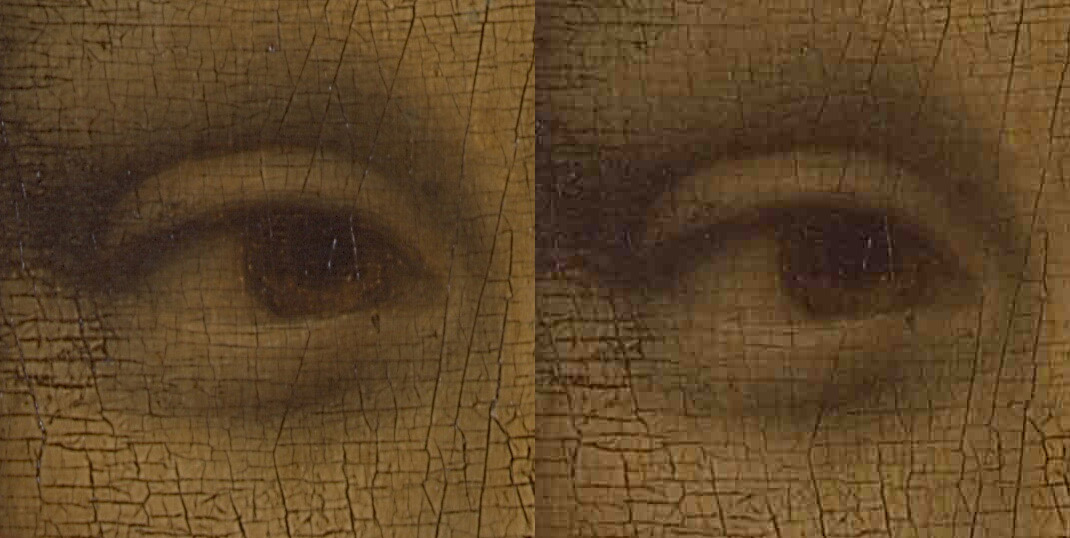
Since the left half was saved with high quality and low compression, it has:
- good colors
- sharp lines
- good overall definition
Since the right half was saved with low quality and high compression it is 75% smaller (27 KB vs. 109 KB), but suffers from more defects:
- fewer colors
- poor transitions from light to dark in the gradients
- many jagged edges
JPEG quality is a trade-off that involves balancing file size and image quality. Adjusting the compression level allows you to prioritize smaller file sizes or better image quality to your liking.
How to convert TIFF to JPEG in macOS Preview
- Open your image in Preview.app.
- Open a Finder window.
- Browse to your TIFF image.
- Right-click (or two-finger click) the TIFF.
- Hover the cursor over “Open With”.
- Click “Preview.app”.
- Click File → Export.
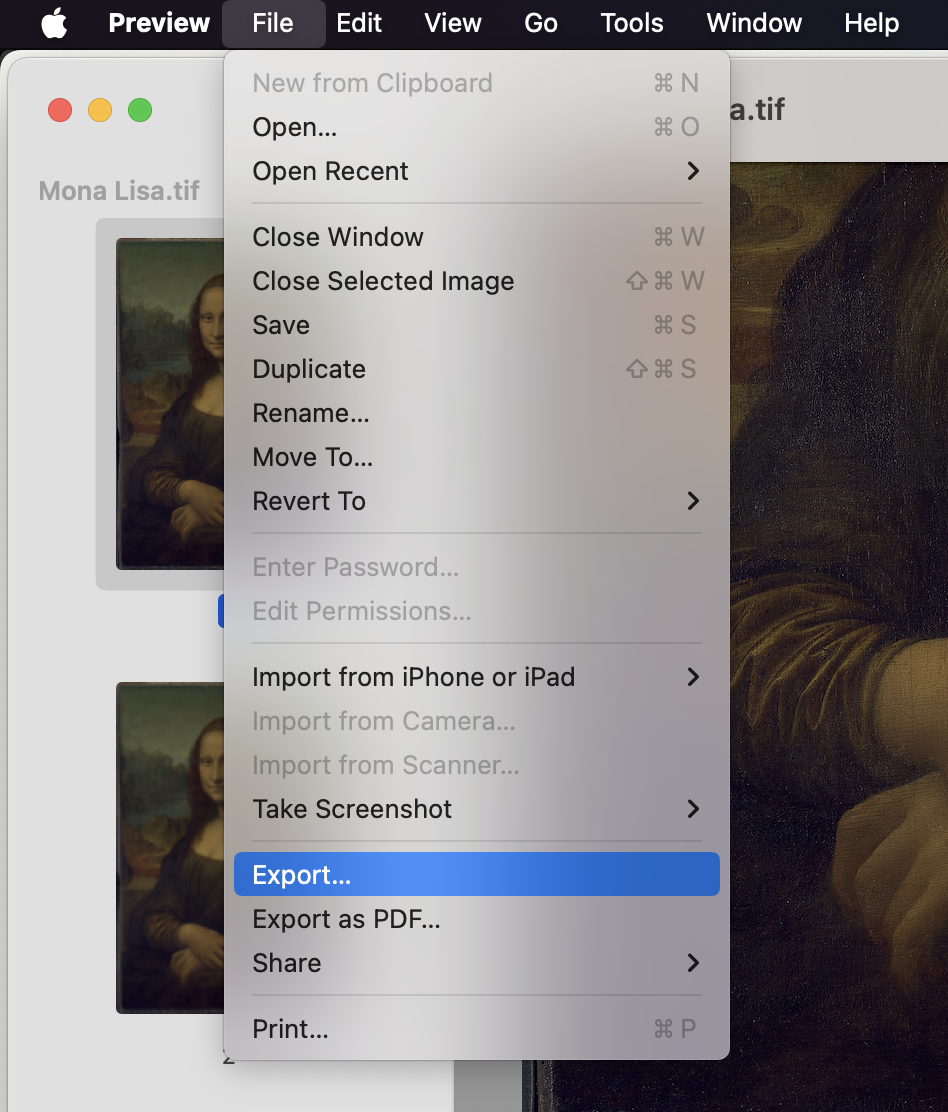
- In the Export dialog, choose JPEG format, a quality setting, and a place to save the new file.
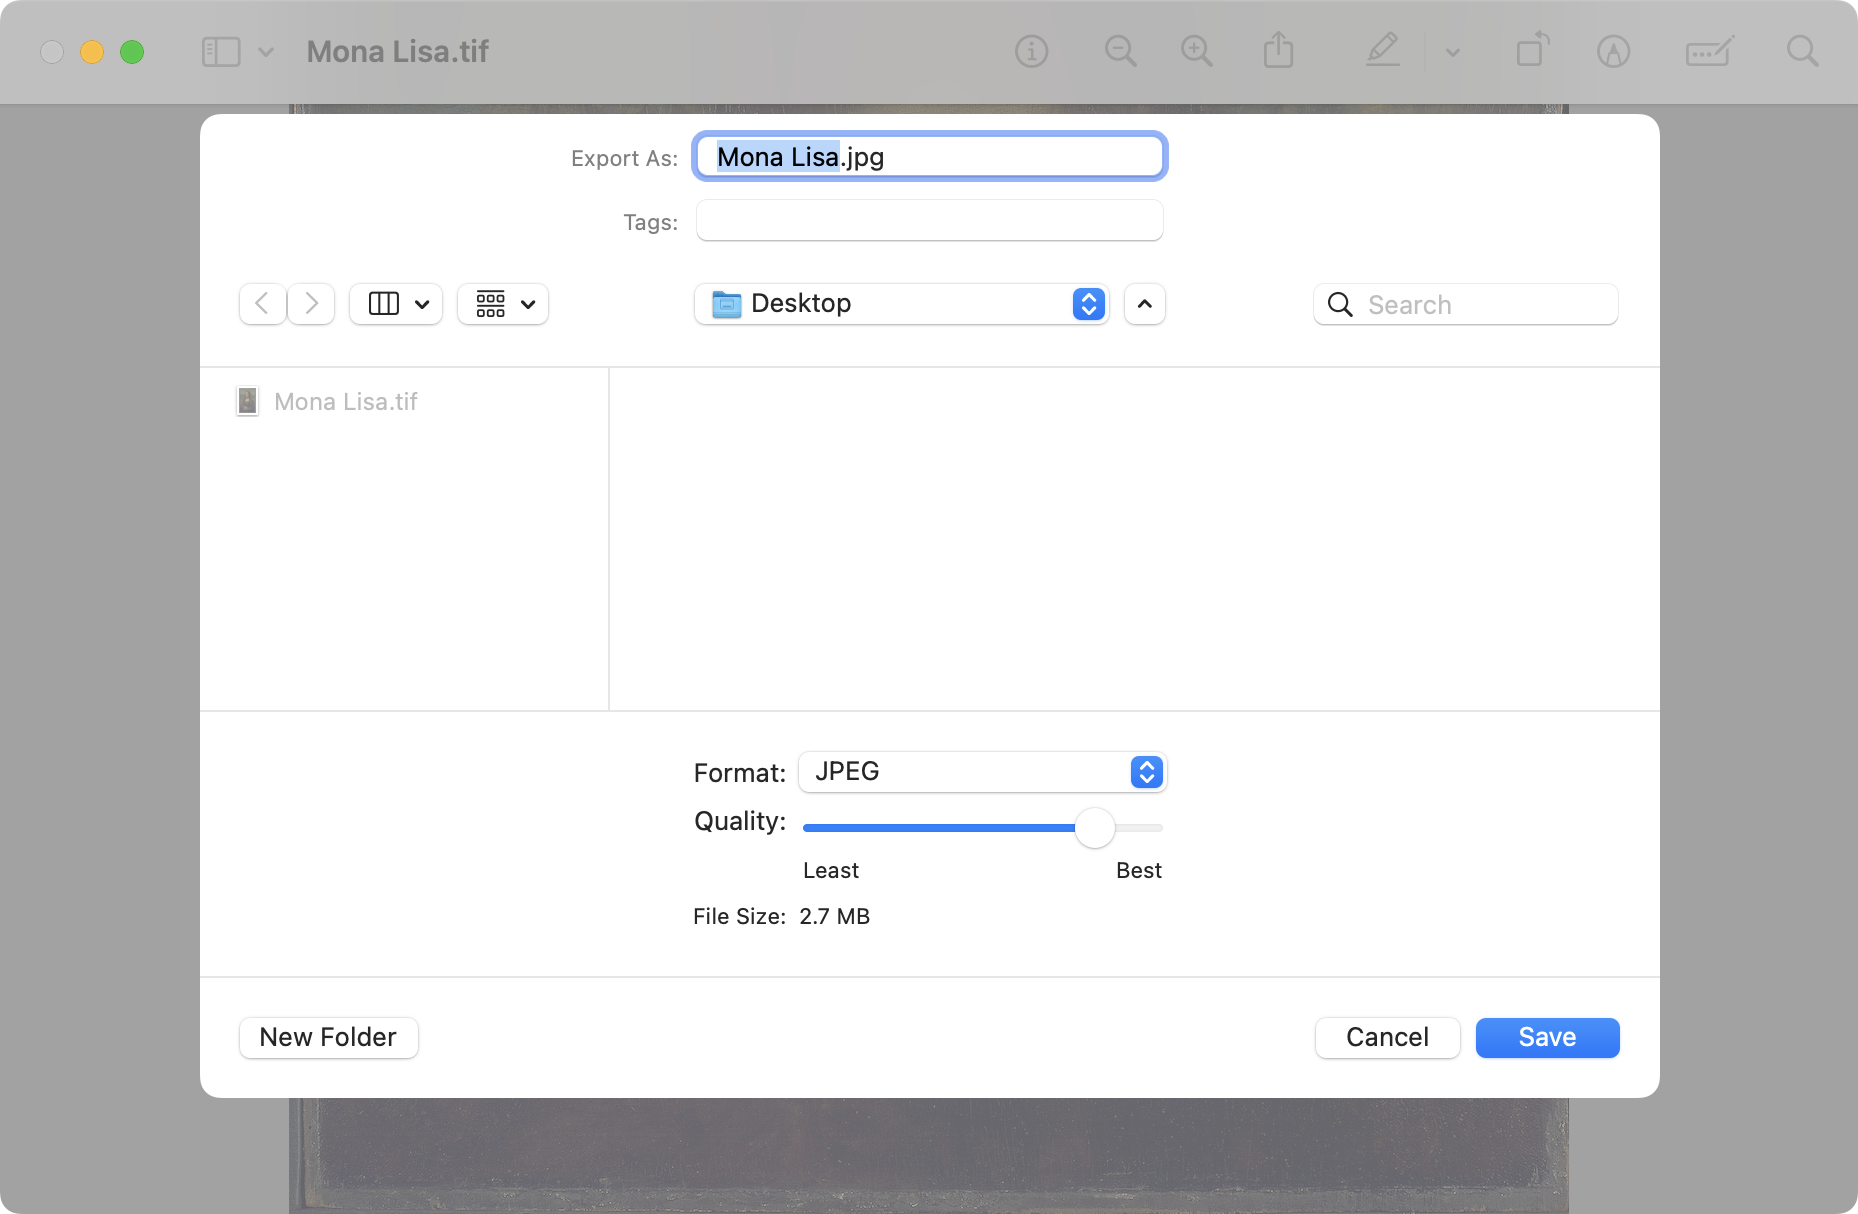
- Enter a new file name in “Export As” (if you wish)
- Browse to the folder where you want to save the JPEG.
- Set the “Format” dropdown menu to “JPEG”.
- Drag the “Quality” slider to your desired balance of image quality vs. file size.
- Click “Save”.
Microsoft Paint
- Right-click your TIFF image in Windows Explorer.
- Hover the mouse over “Open with”.
- Click “Paint”.
- Click “File” once the TIFF has opened.
- Hover the mouse over “Save As”.
- Click “JPEG picture”.
- In the “Save As” dialog, browse to a folder where you want to save your JPEG.
- Enter a new name in the “File Name” text box (if you want to rename the image).
- Click “Save.”
Adobe Photoshop
- Click “File” then “Save a Copy…”
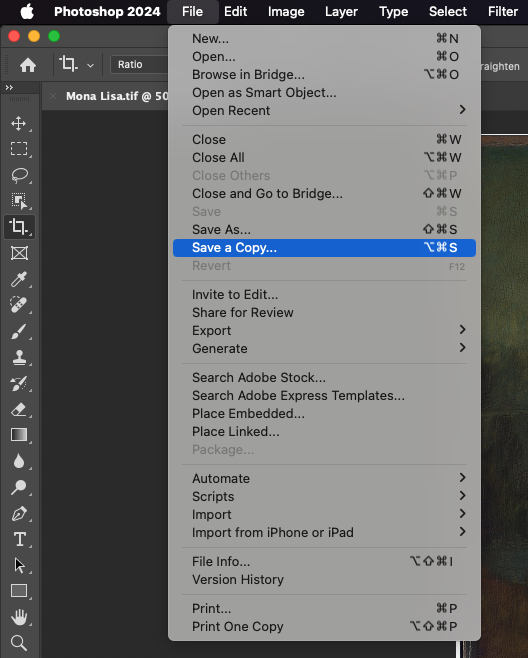
- The Save File Dialog appears. If you want, edit the file name in the “Save As” text field.
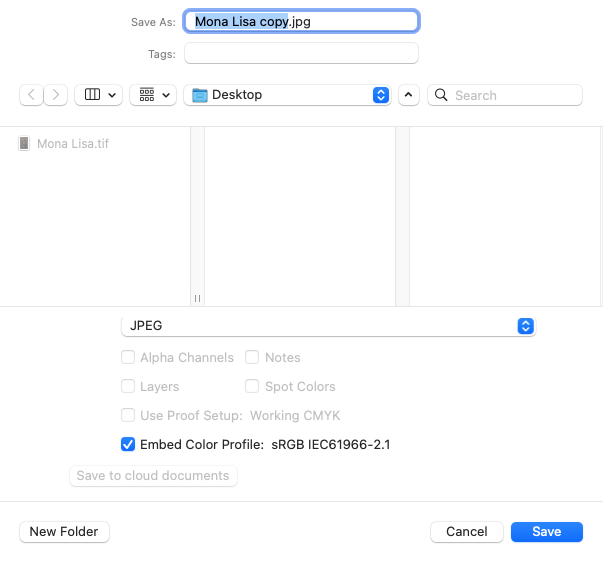
- Set “Format” to JPEG.
- Click “Save”.
- The quality selection window appears. Check the “Preview” box to see the image dynamically change to reflect your settings.
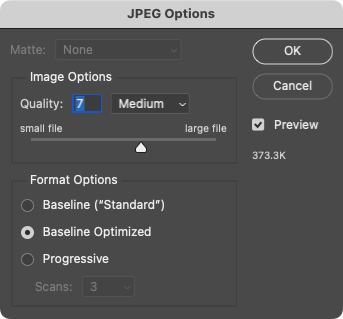
- Set the quality by picking a preset or dragging the slider.
- As you adjust, notice the file size on the right and the image in the background both changing.
- If the file size becomes too large, reduce the quality setting.
- If the image preview gets too choppy looking, increase the quality setting.
- Choose a Format Option:
- Baseline (“Standard”): Pick this if you aren’t sure or want compatibility with the most software.
- Baseline Optimized: Similar to baseline but uses compression to reduce file size. Pick this if you need an even smaller file.
- Progressive: Choose this if you want users to see the image appear all at once and progressively get better in quality as it loads.
- Click “OK” to finish exporting your JPEG.
Photo Mechanic
Photo Mechanic is a popular image browser among photographers because it’s very fast at sorting and culling a lot of image files. It can also convert between TIFF and JPG.
- Start Photo Mechanic and navigate to your image’s folder.
- Click the TIFF once to highlight it.
- Press the S key (or right-click the TIFF and choose “Save photo as…”) to open the “Save As” tool.
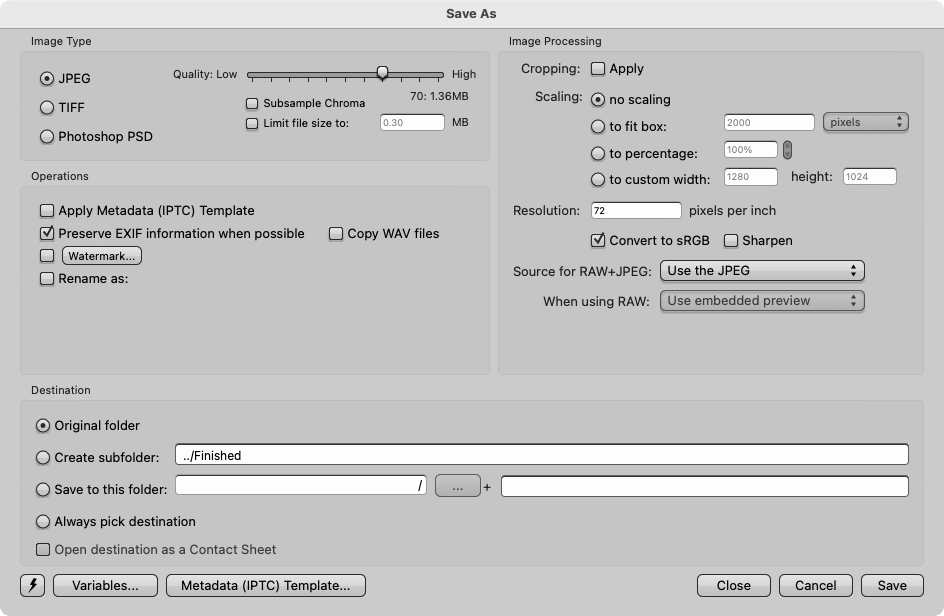
- Adjust the “Image Type” settings:
- Choose the “JPEG” radio button.
- Set the Quality slider somewhere between Low and High.
- Low quality reduces file size.
- High quality increases file size.
- Adjust the “Image Processing” settings:
- Optionally adjust the scaling to make the new image bigger or smaller (pick “no scaling” to leave it the same size).
- Set “Resolution” to 72 if the image is meant to be viewed on screen, or 300 if you plan to print it.
- Set “Destination” to “Original folder” to create the JPEG in the same directory as its source TIFF.
macOS Finder “Convert Image” Quick Action
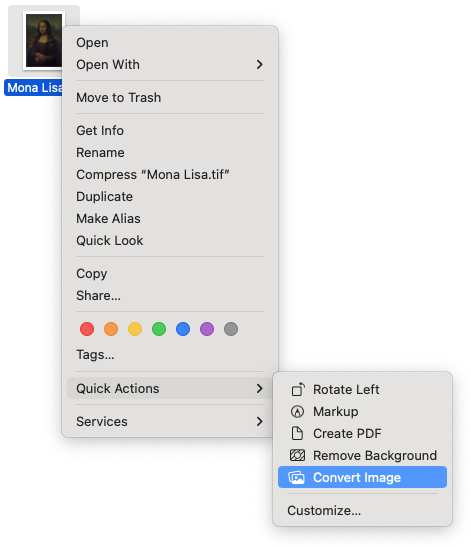
You can right-click on any image file in Mac OS and use the “Covert Image” quick action to change it to another format.
- Open Finder and browse to the folder where your TIFF image is saved.
- Right-click the TIFF image (trackpad & one-button mouse users can click with two fingers).
- Mouse-over “Quick Actions” and click “Convert Image”:
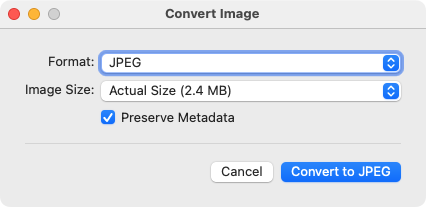
- The “Convert Image” dialog box will appear.
- Set “Format” to “JPEG”:
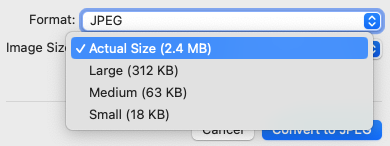
- Change “Image Size” to “Small”, “Medium” or “Large” if you want to adjust the file size of the final JPEG:
- Press the “Convert to JPEG” button.
A new JPEG file will appear alongside the original TIFF in the Finder window. The JPEG’s filename will be highlighted, so type a new name (if you want to rename it) and press Enter.
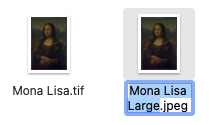
Don’t worry if another JPEG with the same name already exists in that folder. The Convert Image action won’t overwrite anything. Instead, it will append a number like “-1” to the end of the new JPEG’s filename.
Are Online Converters Safe?
Google “convert tiff to jpg” and plenty of online converters will appear. At first, they seem like the easiest option… upload your images and let the converter do the work. However, stop and ask yourself, “is this safe?”
The short answer is probably not.
Uploading image files to online converters is risky because you’re giving unknown websites access to your files, which could compromise your privacy and security.
- How long will they keep your images? Indefinitely?
- Do they have strong protections in place to safeguard your data?
- Will they use your images for any other purpose?
- Do they share them with anyone else?
- Has the site ever been hacked?
Even if the converter site claims to be secure and private, how do you know those claims are true? Unless it is audited by an independent third party such as a CPA or accounting firm (this is very expensive!), there is no way to know for sure.
Once you upload your images to an online converter, you can never take them back. The safest choice is to ignore the online converters and use the instructions in this article to do the TIFF-to-JPEG conversion yourself.